Unlock Viral Views: Film Stunning 360° Room Tours for TikTok & YouTube
## Introduction: Step into the Immersive World of 360° Room Tours
Viewers crave immersive, shareable content. Room tours have exploded on TikTok and YouTube, drawing millions to creative home, studio, and even workspace showcases. These videos captivate by combining sharp visuals with personal storytelling.
Filming a 360-degree room tour elevates this trend. It puts viewers at the center, letting them explore every detail as if they’re standing in the space. Imagine your audience swiping and pinching to examine every nook and cranny of your meticulously curated space. That’s the power of 360°.
If you’re wondering how to create these standout tours, this guide lists the essential tips. Get ready to transform your space into a digital playground and capture attention like never before!
## Use a Stable 360 Camera and Tripod
A shaky 360 shot pulls viewers out of the experience fast. Eliminate any jitter by investing in a good quality 360 camera and a sturdy tripod.
**Choosing the Right Camera:** Look for cameras that offer high resolution (ideally 5.7K or higher) to capture crisp details. Consider features like in-camera stabilization, easy-to-use interfaces, and compatibility with editing software. Popular options include the Insta360 series, Ricoh Theta, and GoPro Max (although the Max requires more stitching).
**The Importance of a Tripod:** A tripod is non-negotiable. It provides a stable base, preventing unwanted movement and ensuring a smooth viewing experience. Opt for a tripod with adjustable height to capture different perspectives. Some tripods are specifically designed for 360 cameras, featuring a small footprint to minimize visibility in the final footage.
**Pro Tip:** Consider a monopod for quicker setups in less spacious areas. While not as stable as a tripod, it offers a good balance of portability and stability.
## Master the Art of Invisible Positioning
One of the biggest challenges with 360° filming is hiding yourself and the tripod. The goal is to make the viewer feel like they are the only one in the room.
**The Nadir Blind Spot:** 360 cameras have a “nadir,” the area directly beneath the camera where the tripod is visible. Some cameras include small tripod attachments designed to minimize the tripod’s appearance. However, strategic placement is key.
**Hiding Techniques:**
* **Offset Positioning:** Don’t place the camera directly in the center of the room. Slightly offset it to one side to create more interesting perspectives and hide the nadir behind furniture.
* **Remote Control:** Use a remote control or smartphone app to start and stop recording, allowing you to step out of the shot entirely.
* **Smart Editing:** Use post-production software to retouch the nadir and remove any remaining traces of the tripod or yourself. Some cameras offer automatic nadir patching.
**Practice Makes Perfect:** Experiment with different positions to find what works best for your space.
## Plan Your Shot and Narrative
Don’t just randomly film your room. Think about what you want to showcase and how you want to guide the viewer’s eye.
**Storyboarding:** Sketch out a rough storyboard outlining the key areas you want to highlight. Consider the flow of the tour and how you want to transition between different parts of the room.
**Highlight Key Features:** Focus on the most visually appealing or interesting aspects of your space. This could be a unique piece of furniture, a stunning view, or a clever organizational hack.
**Add Personal Touches:** Incorporate personal elements to make the tour more engaging. Share anecdotes about the space, explain the inspiration behind your design choices, or highlight your favorite items.
**Sound Matters:** Consider adding background music or narration to enhance the viewing experience. Choose music that complements the mood of your space. If you opt for narration, keep it concise and informative.
## Light it Up: Optimize for Visual Appeal
Good lighting is crucial for any video, but it’s especially important for 360° tours. Even lighting will make the entire scene easier to see.
**Natural Light is Your Friend:** Utilize natural light whenever possible. Open curtains and blinds to maximize the amount of sunlight entering the room.
**Supplement with Artificial Lighting:** If natural light is insufficient, supplement with artificial lighting. Aim for soft, diffused lighting to avoid harsh shadows. Consider using multiple light sources to create a more even and balanced illumination.
**Avoid Direct Sunlight:** Direct sunlight can create harsh shadows and blow out highlights, so try to diffuse it with curtains or blinds.
**Color Temperature Consistency:** Ensure that all your light sources have a similar color temperature to avoid color casts.
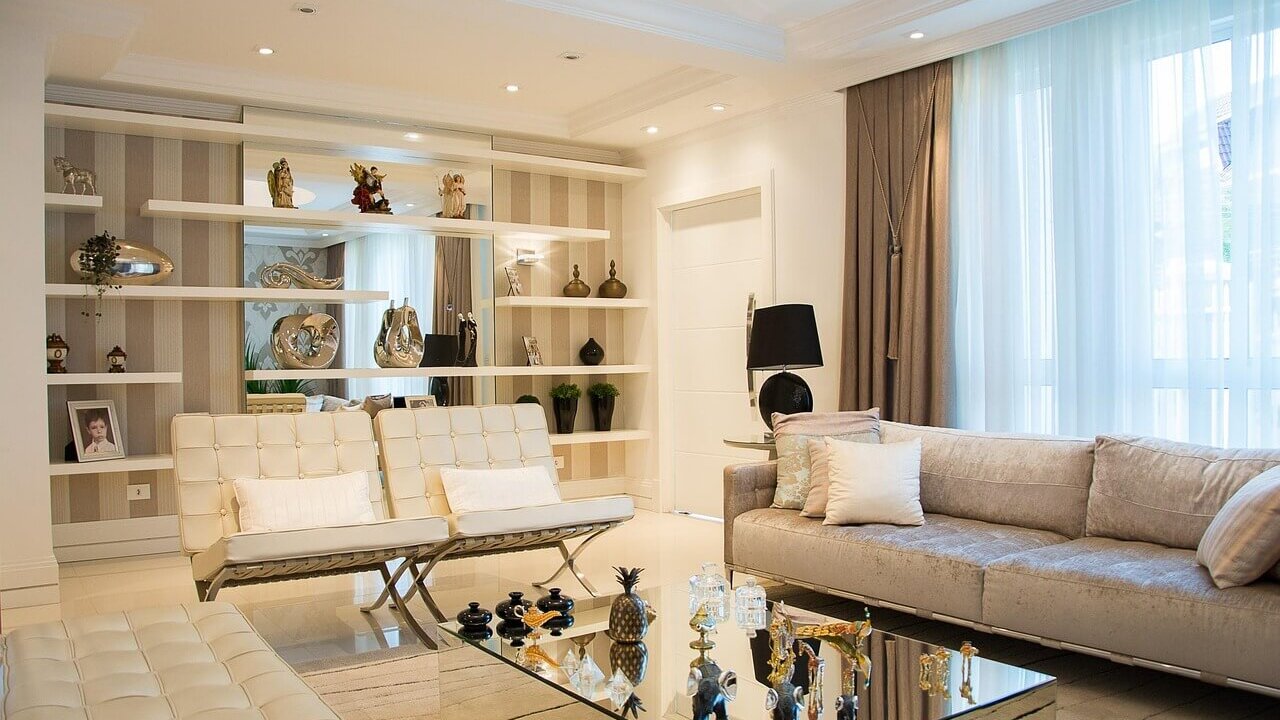
## Clean and Declutter: Present Your Best Space
A cluttered room can be distracting and detract from the overall viewing experience.
**Declutter Thoroughly:** Remove any unnecessary items, such as piles of paper, dirty dishes, or random objects scattered around the room.
**Organize and Style:** Arrange furniture and accessories in an appealing and visually balanced way. Consider adding plants or other decorative elements to enhance the aesthetic.
**Pay Attention to Details:** Make sure everything is clean and tidy. Dust surfaces, wipe down windows, and vacuum floors.
**Stage Your Space:** Think of your room tour as a photoshoot. Take the time to stage your space to create a visually appealing and inviting atmosphere.
## Audio Considerations: Sound Matters
While visuals are paramount, don’t neglect the audio component.
**Minimize Background Noise:** Turn off any appliances that are making noise, such as fans or air conditioners. Close windows to reduce outside noise.
**Use an External Microphone:** If you plan on adding narration, use an external microphone for better audio quality. Wireless lavalier microphones are a good option for 360° filming.
**Edit Your Audio:** Use audio editing software to remove any unwanted background noise, adjust levels, and add music or sound effects.
**Consider Ambient Sounds:** Subtle ambient sounds can add to the immersive experience. Consider recording natural sounds from your space, such as birds chirping or rain falling.
## Edit Like a Pro: Stitching and Refining
Post-production is where you bring your 360° footage to life. You have to stitch the different camera views together seamlessly to create a continuous viewing experience.
**Stitching Software:** Most 360 cameras come with their own stitching software. However, professional editing software like Adobe Premiere Pro or Final Cut Pro also offer 360° editing capabilities.
**Stabilization:** Use stabilization tools to smooth out any remaining camera shake.
**Color Correction:** Adjust the colors to create a consistent and visually appealing look.
**Adding Titles and Graphics:** Incorporate titles, captions, and graphics to provide context and enhance the viewing experience.
**Virtual Reality Integration:** Some editing software allows you to create interactive elements within your 360° tour, such as clickable hotspots that provide additional information.
## Optimize for TikTok and YouTube
Once your 360° tour is edited, optimize it for each platform.
**TikTok:**
* **Short and Sweet:** Keep your videos short and engaging (under 60 seconds).
* **Trending Sounds:** Use trending audio to increase visibility.
* **Engaging Captions:** Write compelling captions that encourage viewers to watch the entire video.
* **Hashtags:** Use relevant hashtags to reach a wider audience.
**YouTube:**
* **Higher Resolution:** Upload your videos in the highest possible resolution (4K or higher).
* **Descriptive Titles:** Use descriptive titles that include relevant keywords.
* **Detailed Descriptions:** Write detailed descriptions that provide context and information about the space.
* **Thumbnails:** Create eye-catching thumbnails that entice viewers to click.
* **Cards and End Screens:** Use cards and end screens to promote other videos or channels.
**Promote Your Tour:** Share your 360° tour on social media and other platforms to drive traffic.
## Conclusion: Embrace the Future of Room Tours
Creating compelling 360° room tours requires a bit of planning and effort, but the results are well worth it. By following these tips, you can create immersive and engaging experiences that will captivate your audience and set you apart from the competition. Embrace the future of room tours and start creating stunning 360° content today!
## FAQs: Your 360° Room Tour Questions Answered
**Q: What’s the best 360 camera for beginners?**
A: The Insta360 X3 is a great option for beginners. It’s relatively affordable, easy to use, and produces high-quality footage.
**Q: How do I hide the tripod in a 360° video?**
A: Use offset positioning, remote control recording, and post-production editing to minimize or eliminate the tripod’s appearance.
**Q: What software do I need to edit 360° videos?**
A: Many 360 cameras come with their own editing software. Adobe Premiere Pro and Final Cut Pro are also popular options.